
Introduction
This guide explains how to connect the RN-320 sensor series to the Ubidots platform.
The Radionode RN320 series is a robust, battery-operated wireless environmental sensor, professionally engineered for durability and extreme longevity, boasting an unbelievable 10-year battery life (RN320-BTH model with 17,000mAh) facilitated by LoRaWAN technology for easy, wide-range network setup.
This specific RN320-BTH model excels with an embedded high-accuracy temperature and humidity sensor, critical data protection via a retransmission function that prevents sample drops, and permanent local storage on a microSD card. User interaction is enhanced by an E-paper display, loud buzzer (97dBA), and a 3-Color LED indicator (Best, Moderate, Bad), while quick access to comprehensive remote monitoring is ensured by simple QR code registration to the Radionode365 service. It also offers easy installation with a magnet and wall bracket.
General Features of RN320 Device
- Long Range Wireless / LoraWAN ®
- E-Paper Display
- Loud Buzzer 97dBA
- 3 Color LED Indicator (Best, Moderate, Bad)
- Long Battery Life (17000mAh)
- MicroSD Card supported
- Easy Installation with Magnet and Wall Bracket
In this integration scenario we use the RN320-BTH series for the demo.
Prerequisites
To continue with this guide, you will need the following:
- RN320-BTH Temperature & Humidity Cloud Data Logger
- LoRaWAN® gateway (in our case, the Radionode LoRaWAN Gateway)
- Configured integration on network server
- Network Server account (The Things Stack)
- Ubidots Account
Device Connection & Setup
1. The Things Stack Community Setup
Register Application
The first step is to register in The Things Stack cloud console. Next, you will create an application.
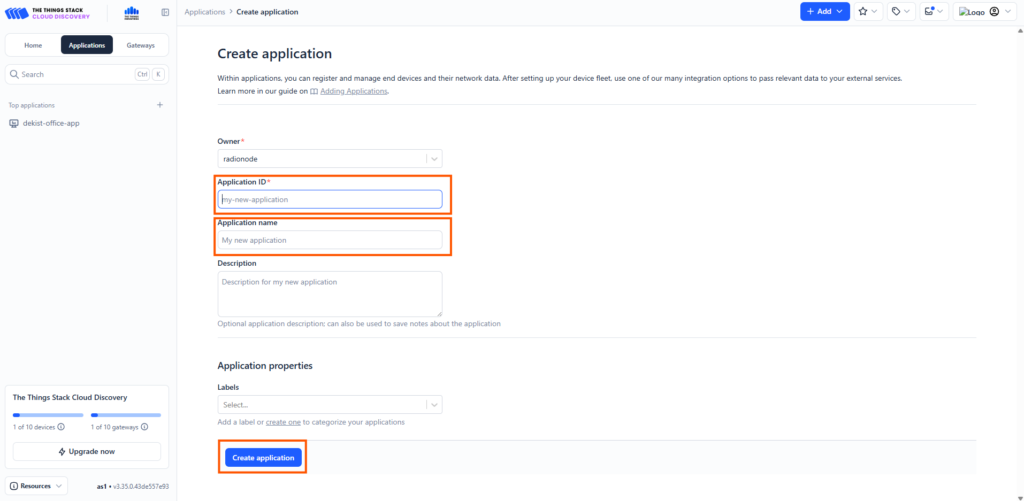
Steps to Create an Application:
- Go to The Things Stack console.
- Open the Applications section.
- Press the Add application tab.
- Fill in the necessary Application ID and Application Name.
- Create the application.
Payload Decoder Setup
To ensure successful data transmission, both the device and the network server must be correctly configured. Our device submits data in binary format, which requires decoding.
We have two options for decoding the device data:
- The Things Stack Decoder: Data will be decoded before entering Ubidots/Thingsboard (assuming Ubidots is the final platform).
- Thingsboard Converters: Uplink/downlink converters will be used to decode data from binary format into JSON within the Thingsboard platform (if used as an intermediary).
1. Implementing the Payload Formatter in The Things Stack (Recommended)
In this documentation, we will explain how to add the payload formatters directly in The Things Stack (TTS) platform.
Steps:
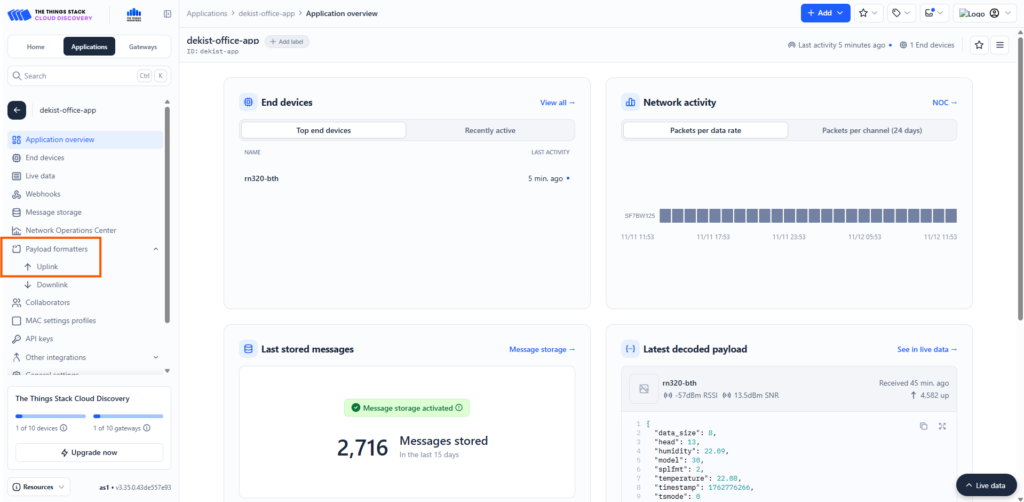
- In your Application tab within the TTS console, locate and click the Payload formatters section.
- Select the Uplink option.
- Copy and paste the required payload formatter code (which should be provided below) into the editor.
function decodeUplink(input) {
  const res = Decoder(input.bytes, input.fPort);
  if (res.error) {
    return { errors: [res.error] };
  }
  return { data: res };
}

function Decoder (bytes, port) {
  const readUInt8 = b => b & 0xFF;
  const readUInt16LE = b => (b[1] << 8) + b[0];
  const readInt16LE = b => {
    const ret = readUInt16LE(b);
    return (ret > 0x7FFF) ? ret - 0x10000 : ret;
  };
  const readUInt32LE = b => (b[3] << 24) + (b[2] << 16) + (b[1] << 8) + b[0];
  const readInt32LE = b => {
    const ret = readUInt32LE(b);
    return (ret > 0x7FFFFFFF) ? ret - 0x100000000 : ret;
  };
  const readFloatLE = b => {
    const buf = new ArrayBuffer(4);
    const view = new DataView(buf);
    for (let i = 0; i < 4; i++) view.setUint8(i, b[i]);
    return view.getFloat32(0, true); // ieee754 float
  };

  const head = readUInt8(bytes[0]);
  const model = readUInt8(bytes[1]);

  if (head === 11) {
    // Check-in frame
    const timestamp = readUInt32LE(bytes.slice(2, 6));
    const date = new Date(timestamp * 1000);
    const yyyy = date.getUTCFullYear();
    const mm = (date.getUTCMonth() + 1).toString().padStart(2, '0');
    const dd = date.getUTCDate().toString().padStart(2, '0');
    const verFormatted = parseInt(`${yyyy}${mm}${dd}`);
    const interval = readUInt16LE(bytes.slice(6, 8));
    const splrate = interval;
    const bat = readUInt8(bytes[8]);
    const millivolt = readUInt16LE(bytes.slice(9, 11));
    const volt = (millivolt / 1000).toFixed(3);
    const freqband = readUInt8(bytes[11]);
    const subband = readUInt8(bytes[12]);

    return {
      head,
      ver: verFormatted,
      interval,
      splrate,
      bat,
      volt,
      freqband,
      subband
    };
  }
  else if (head === 12 || head === 13) {
    // Sensor / Hold
    const tsmode = readUInt8(bytes[2]);
    const timestamp = readUInt32LE(bytes.slice(3, 7));
    const splfmt = readUInt8(bytes[7]);

    if (splfmt !== 2) {
      return { error: "Unsupported Sensor Data Format: " + splfmt };
    }

    const raw_size = 4;
    const data = bytes.slice(8);
    const ch_count = data.length / raw_size;
    const data_size = data.length;
    let offset = 0;
    let temperature = null, humidity = null;

    if (ch_count < 2) {
      return { error: "Unsupported Sensor Data Size:" + ch_count };
    }

    temperature = parseFloat(readFloatLE(data.slice(offset, offset + raw_size)).toFixed(2));
    if (temperature <= -9999.0) temperature = null;
    offset += raw_size;

    humidity = parseFloat(readFloatLE(data.slice(offset, offset + raw_size)).toFixed(2));
    if (humidity <= -9999.0) humidity = null;

    return {
      head,
      model,
      tsmode,
      timestamp,
      splfmt,
      data_size,
      temperature,
      humidity
    };
  }

  return { error: "Unsupported head frame: " + head };
}
Registering the End Device
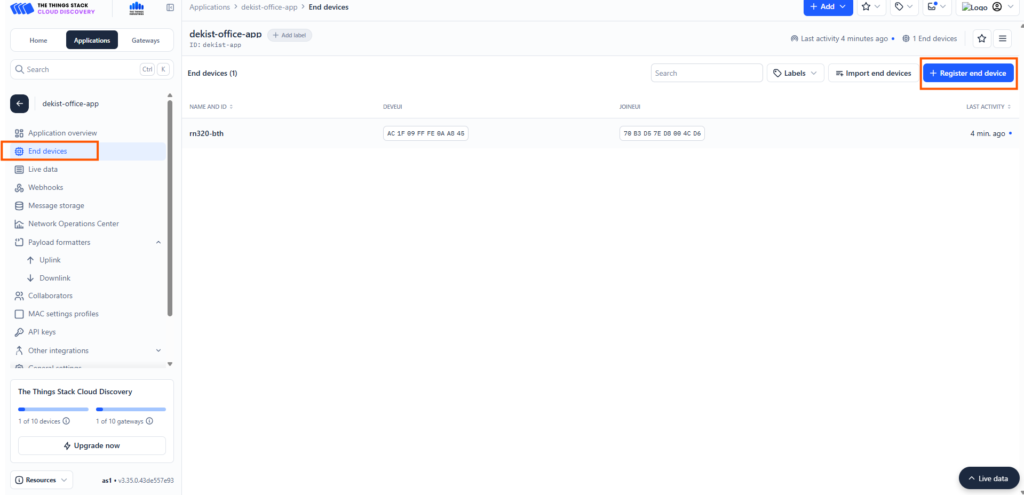
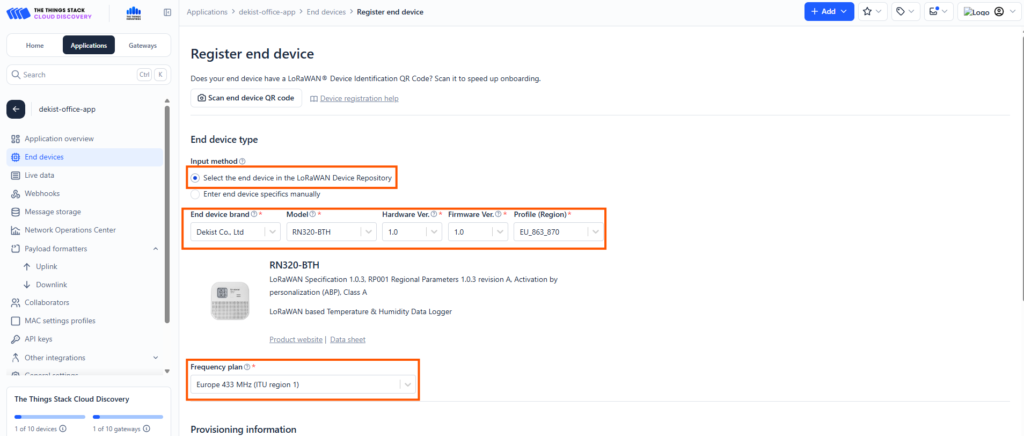
To register the end device, follow the steps below and enter the necessary details (as you would see them in the accompanying image):
- Input Method: Select the end device in the LoRaWAN Device repository.
> Note: Radionode devices are already registered in The Things Stack platform for easy selection. - End Device Brand: Choose the option
Dekist Co.Ltd. - Model: You can choose among the available Radionode LoRaWAN models.
- Cluster Selection: Choose the cluster where the device can be added.
Finalizing Device Registration
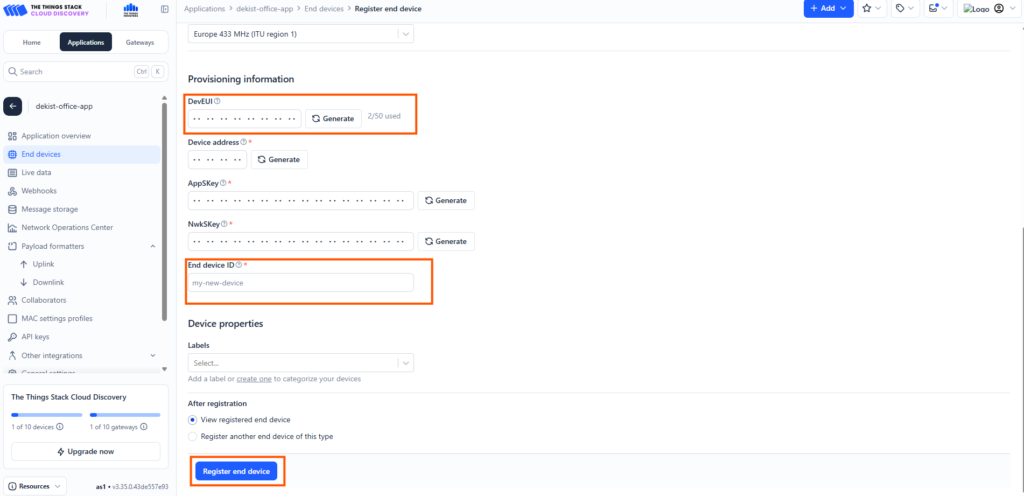
- Next, you need to enter the DevEUI correctly in the slot provided. You can find the DevEUI printed on the sticker located on the side of the physical device.
- After entering the DevEUI, add a unique End Device ID in the given slot.
- Once both are entered, complete the end device registration.
Ubidots Setup
After successfully logging in to the Ubidots platform:
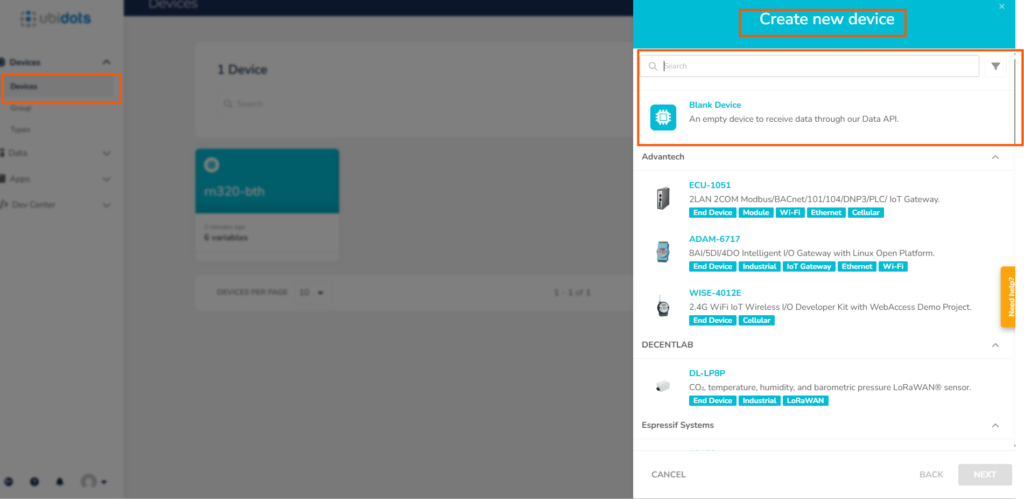
- Click the Devices option in the navigation menu.
- Create a new device by selecting the Blank device type.
Naming the New Device
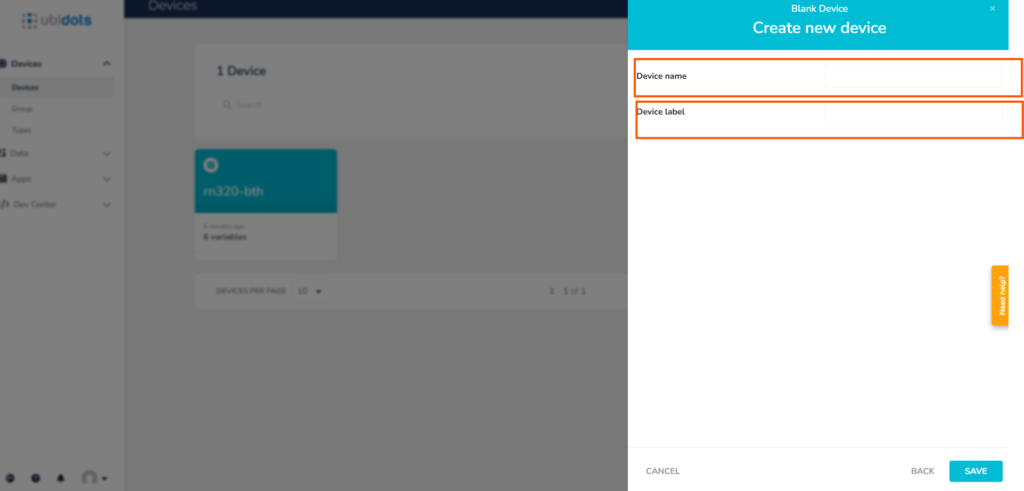
- After selecting the Blank device option, you will need to provide a Device name.
- Also provide a corresponding Device label.
- Finally, click Save to complete the new device creation.
Webhook and Authorization Setup
The next critical step is creating the webhook within the TTN (The Things Network) platform. To achieve this, you first need to obtain the necessary Authorization Token from Ubidots.
Copying the Ubidots API Token
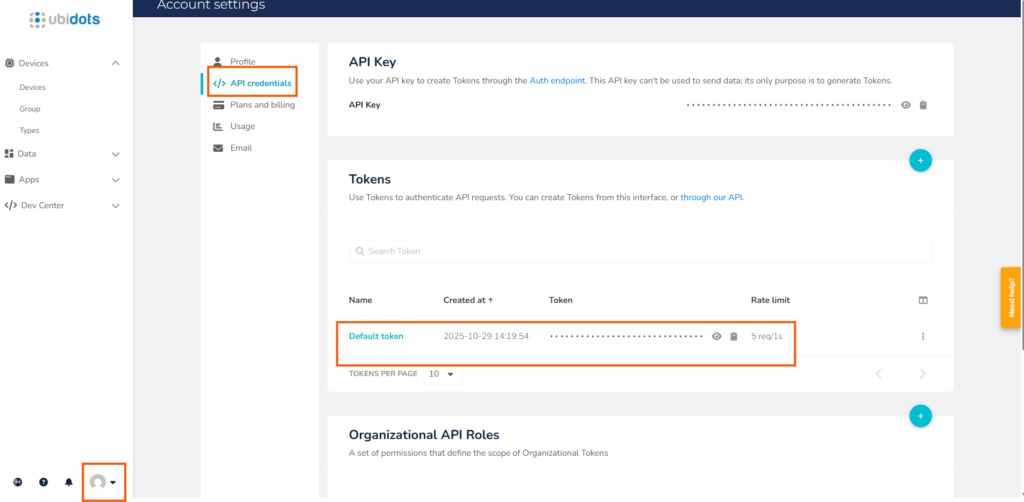
- Navigate to your Ubidots Account Settings.
- Look for the API Credentials option (or similar).
- Click on API Credentials to reveal your tokens.
- You will find a default token (usually labeled as the Authorization Token).
- Copy and securely store this token, as it will be required when configuring the webhook in the TTN platform.
Creating the Webhook in TTN Stack
Now that you have your Authorization Token, you can configure the webhook in The Things Network (TTN) platform:
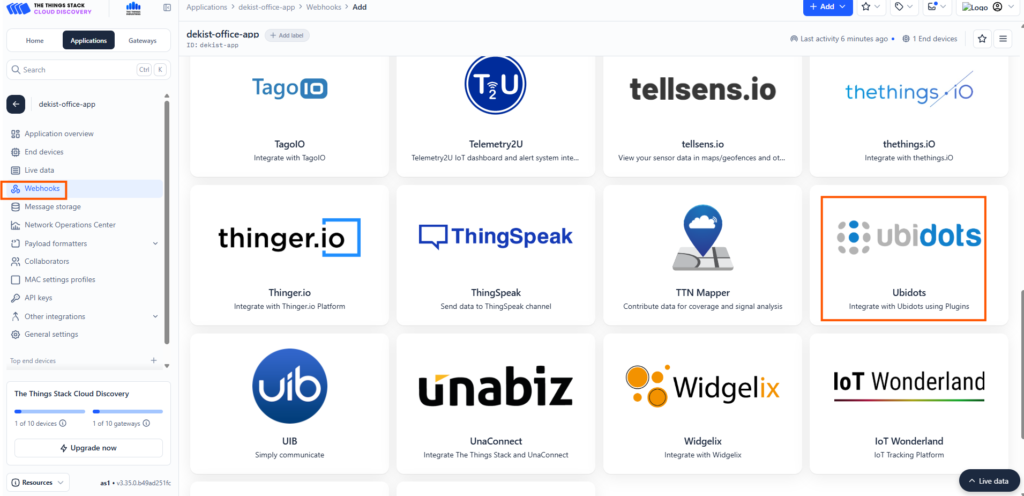
- In the TTN Console for your application, click on the Webhooks option in the navigation menu.
- Click the + Add Webhook button.
- Choose the Ubidots integration template from the list of options.
Completing the Webhook Details
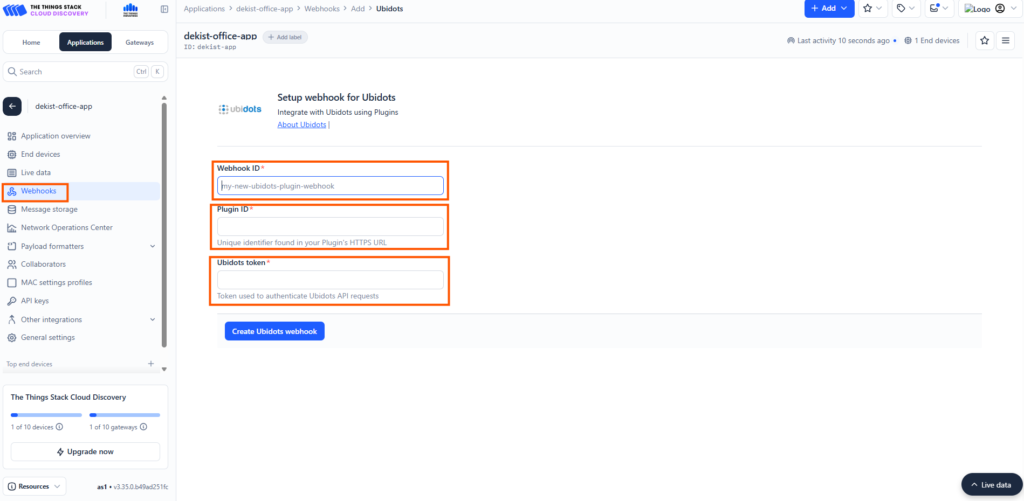
To finalize the webhook creation in The Things Network (TTN) Console, you will need to input the required parameters:
- Webhook ID: Enter a unique and descriptive identifier for this webhook (e.g.,
ubidots-integration). - Plugin ID: Enter the specific Ubidots Plugin ID (this may be pre-filled or need to be entered based on the region/setup).
- Authorization Token: Paste the Authorization Token you previously copied from the Ubidots platform into the designated field.
After filling in these details, click Create webhook (or equivalent button) to establish the connection.

Verifying Data Flow
Once the webhook is successfully created and your device is actively connected to The Things Network (TTN) gateway:
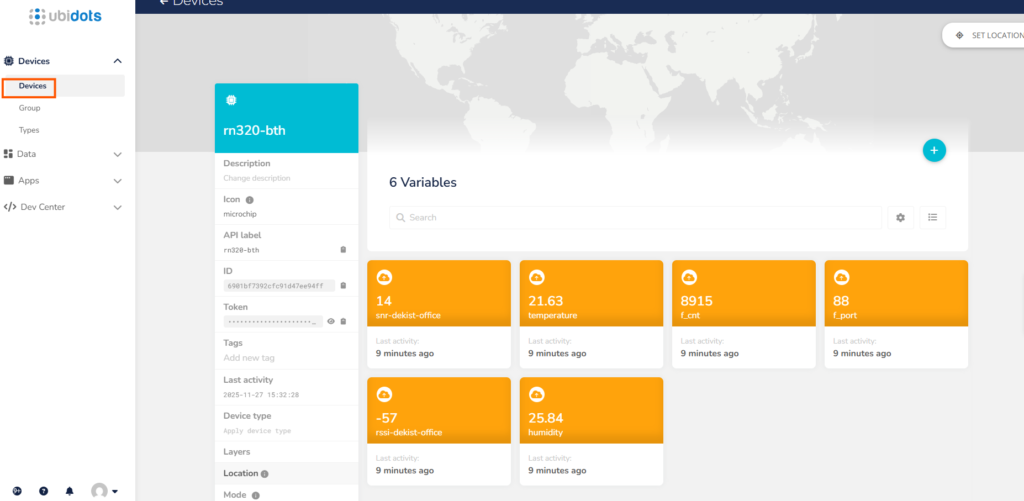
- Communication is established, and the sensor data begins to be forwarded automatically to the Ubidots platform.
To view the incoming data:
- Navigate to the Devices tab in your Ubidots account.
- Click on the specific device associated with your TTN application.
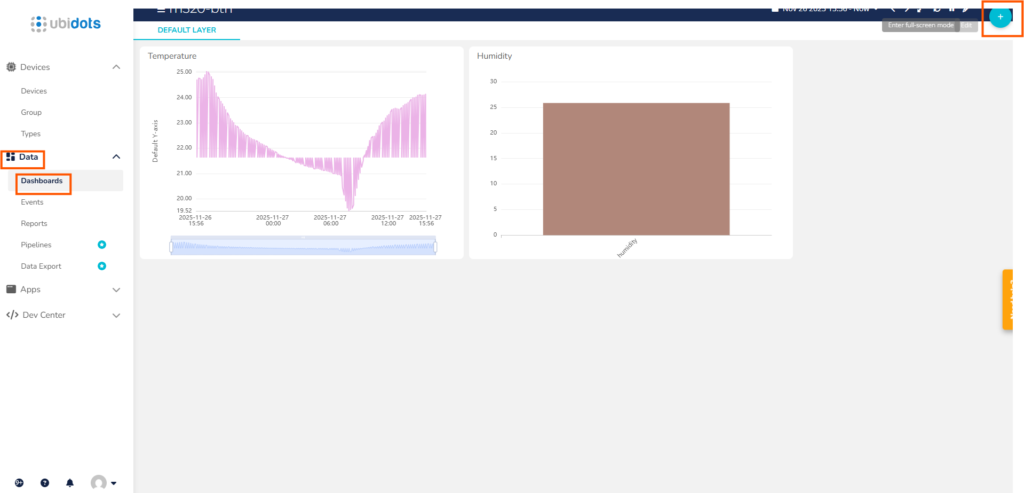
Creating a Data Dashboard
To visualize the incoming data, you need to create a dashboard in Ubidots:
- Navigate to the Data tab on the main menu.
- Select Dashboards.
- Click the + sign (or Create Dashboard button).
- Once the dashboard is created, click the + sign again to add widgets.
- Select from the different widget options (e.g., charts, gauges, indicators) to create a visualization of your data.
 Korean
 Arabic
 Chinese (Simplified)
 Dutch
Dutch English
 French
 German
 Hebrew
 Italian
 Japanese
 Portuguese
 Russian
 Spanish
 Thai
Thai Vietnamese